Introduction
Arduino ultrasonic sensor projects are widely used in smart parking, obstacle detection, and security systems. In this tutorial, we’ll create an ultrasonic sensor with LED and LCD alert to measure distance and trigger an alert when an object is too close.
This project is built using the UNO R3 Starter Kit, which includes all necessary components for beginners to start with Arduino-based proximity sensors. By the end of this guide, you’ll have a working distance measurement system that displays real-time data on an LCD screen and triggers an LED alert when needed.
Components Required
This project uses components from the EEmentor’s UNO R3 Starter Kit, an essential bundle for anyone exploring Arduino projects.
| Component | Quantity |
|---|---|
| Arduino Uno (UNO R3) | 1 |
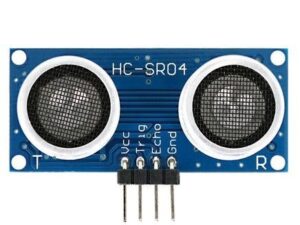
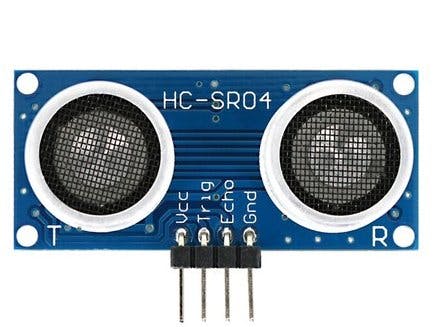
| HC-SR04 Ultrasonic Sensor | 1 |
| Red LED | 1 |
| Resistor (220Ω) | 1 |
| LCD (16×2 with I2C Module) | 1 |
| Breadboard | 1 |
| Jumper Wires | 8 |
Get the UNO R3 Starter Kit today! 👉 Shop Here
Circuit Diagram & Connections
Connecting the HC-SR04 Ultrasonic Sensor
| Ultrasonic Sensor Pin | Connects To |
|---|---|
| VCC | 5V (Arduino) |
| GND | GND (Arduino) |
| TRIG | Digital Pin 9 |
| ECHO | Digital Pin 10 |
Connecting the LED
| LED Pin | Connects To |
|---|---|
| Anode (long leg, +) | Digital Pin 7 (via 220Ω resistor) |
| Cathode (short leg, -) | GND |
Arduino Code
#define TRIG_PIN 9  // Trigger pin for ultrasonic sensor
#define ECHO_PIN 10 // Echo pin for ultrasonic sensor
#define LED_PIN 7   // Red LED pin

void setup() {
  pinMode(TRIG_PIN, OUTPUT);
  pinMode(ECHO_PIN, INPUT);
  pinMode(LED_PIN, OUTPUT);
  Serial.begin(9600); // Initialize Serial Monitor
}

void loop() {
  long duration;
  float distance;

  // Send ultrasonic pulse
  digitalWrite(TRIG_PIN, LOW);
  delayMicroseconds(2);
  digitalWrite(TRIG_PIN, HIGH);
  delayMicroseconds(10);
  digitalWrite(TRIG_PIN, LOW);

  // Read echo signal
  duration = pulseIn(ECHO_PIN, HIGH);

  // Convert time to distance (in cm)
  distance = duration * 0.034 / 2;

  // Print distance to Serial Monitor
  Serial.print("Distance: ");
  Serial.print(distance);
  Serial.println(" cm");

  // Turn LED ON if distance is less than 10 cm
  if (distance < 10) {
    digitalWrite(LED_PIN, HIGH); // LED ON
  } else {
    digitalWrite(LED_PIN, LOW);  // LED OFF
  }

  delay(500); // Small delay before next reading
}
How the Ultrasonic Sensor Project Works
- The HC-SR04 sensor emits ultrasonic waves and measures the time taken for them to bounce back.
- Arduino calculates the distance using the speed of sound formula.
- If the object moves closer than 10 cm, the red LED turns ON, and the LCD displays a warning.
- If the object remains at a safe distance, the LED stays OFF, while the LCD updates the real-time distance.
Practical Applications of an Ultrasonic Sensor
- Smart Parking Systems – Alerts when a car is too close to an obstacle.
- Obstacle Avoidance for Robots – Helps robots navigate safely.
- Home Security Systems – Detects movement and activates alarms.
- Automatic Door Openers – Opens doors upon human presence detection.
📌 Explore more Arduino projects like this:
✅ Tilt Sensor: How It Works & Arduino Alarm Project Tutorial
✅ Arduino UNO Fingerprint Door Lock: A door locked that is opening using fingerprint
🎯 Future Enhancements
Want to take this project to the next level? Consider adding:
✅ A buzzer for an audible alert when an object is detected.
✅ Multiple LEDs (green for “safe,” red for “alert”).
✅ IoT connectivity to send distance alerts via WiFi or Bluetooth.
Conclusion
The Ultrasonic Sensor with LED & LCD Alert project is a great way to learn Arduino and sensor-based automation. It provides practical applications in smart security, robotics, and parking assistance.
Want to build this project?
🛒 Get the UNO R3 Starter Kit with all components included: 👉 Shop Here 🚀
📌 Have questions? Drop them in the comments section!